The third law compares effort and result: volume is the effort expended, and the resulting price move shows whether that effort achieved anything. When the two agree, the move is healthy; when they disagree, something is being hidden.
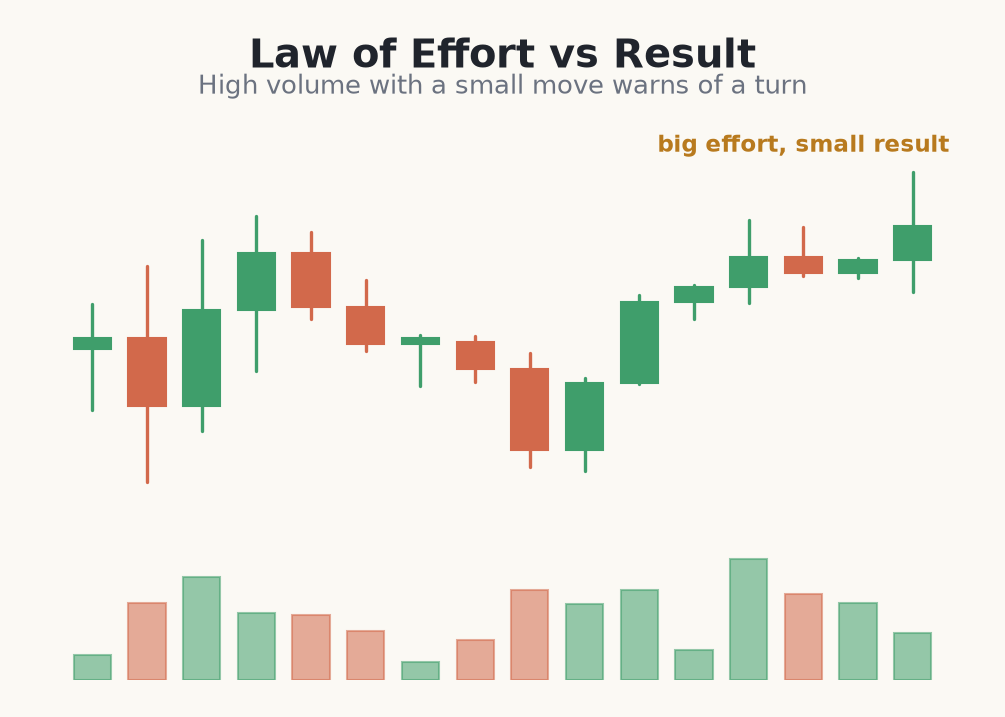
When effort and result diverge
Imagine a large down-candle on huge volume that fails to make a meaningful new low. That is enormous selling effort with little downward result — a sign that buyers are absorbing everything offered, hinting at hidden demand beneath the surface.
The same logic works in reverse. A push to new highs on shrinking volume is a large result achieved with little effort, which can mean the move is running on fumes. Divergence between effort and result is one of Wyckoff's most useful early warnings.
- High volume, small result: absorption — the opposing side is stepping in.
- Low volume, large result: little resistance, but momentum may be thin.
- High volume with a wide, closing move: effort and result agree — genuine strength.
- A climactic bar that reverses: exhaustion of the prevailing side.
How to read effort vs result correctly
The read only works when you compare volume to the right baseline. 'High volume' means high relative to the recent average, and 'small result' means a narrow candle spread and a close that gives back most of the move. Always judge the two together: a wide bar closing on its high with triple-average volume is effort confirming result; a wide bar that opens strong but closes back at its low on the same volume is effort being absorbed. The close inside the bar often matters more than where it reached.
How to use divergence in a trade
Effort-versus-result divergence is best used as early confirmation, not a standalone entry. A huge-volume down-bar that fails to make a new low at range support builds your case for demand — but you still wait for a structural trigger before buying, and you still place a stop below the bar. Divergence tells you the opposing side is quietly winning; the structure and stop turn that into a survivable trade.
Trading a bullish effort-vs-result divergence
- 1At the base of a range near 1.3200 on GBP/USD, a down-bar prints on volume double the average but its spread is tiny and it closes back at 1.3215 — huge effort, almost no downward result.
- 2That is absorption: sellers threw everything and price barely moved. You mark 1.3200 as demand and wait for a trigger.
- 3Next session a wide up-bar closes near its high on rising volume — effort and result now agree upward. You enter long at 1.3230.
- 4Stop below the absorption bar's low at 1.3180. Risk = 50 pips.
- 5Account €1,000, risk 1% = €10. A 50-pip stop sizes to about 0.02 lots so a full stop costs ~€10. Target the range top near 1.3350, ~120 pips, roughly 2.4:1.
- 6If price closes back under 1.3180, the absorption failed — you exit. One divergence never justifies holding through a broken stop.
Volume is effort, price movement is result — when heavy effort produces little result, the opposing side is quietly taking over.
Common beginner mistakes with effort vs result
- Judging volume with no baseline. A bar is only 'high volume' relative to its recent average. Without that comparison the whole read is guesswork.
- Ignoring the close. Where a bar reaches matters far less than where it closes. A spike that gives it all back is absorption, not strength.
- Treating one divergent bar as a signal. A single high-effort-low-result bar is a clue, not an entry. Wait for structure to confirm before committing.
- Fighting a genuine trend on thin evidence. Low-volume new highs can persist far longer than expected. 'Running on fumes' is not the same as reversing.
- Skipping the stop after a clean-looking divergence. Absorption fails regularly. The bar that looked like hidden demand can be blown straight through — size and stop still decide the outcome.
Volume interpretation is an art, not a formula. Data quality varies by market, a single bar rarely decides anything, and apparent divergences sometimes resolve against you. Use effort versus result to build a case, then confirm it with structure.