A high volume node, or HVN, is a local peak on the volume profile — a price level where an unusually large amount of trading occurred. Unlike the single POC, a profile can hold several HVNs, each marking a zone of strong agreement where buyers and sellers were both willing to transact heavily. They are the profile's thick, sticky bands.
Because so much business was settled there, price tends to slow down and consolidate around an HVN. When price returns to one, it often stalls, chops sideways, or reverses, because the market again finds plenty of willing counterparties on both sides. An HVN is where momentum goes to die and ranges are born.
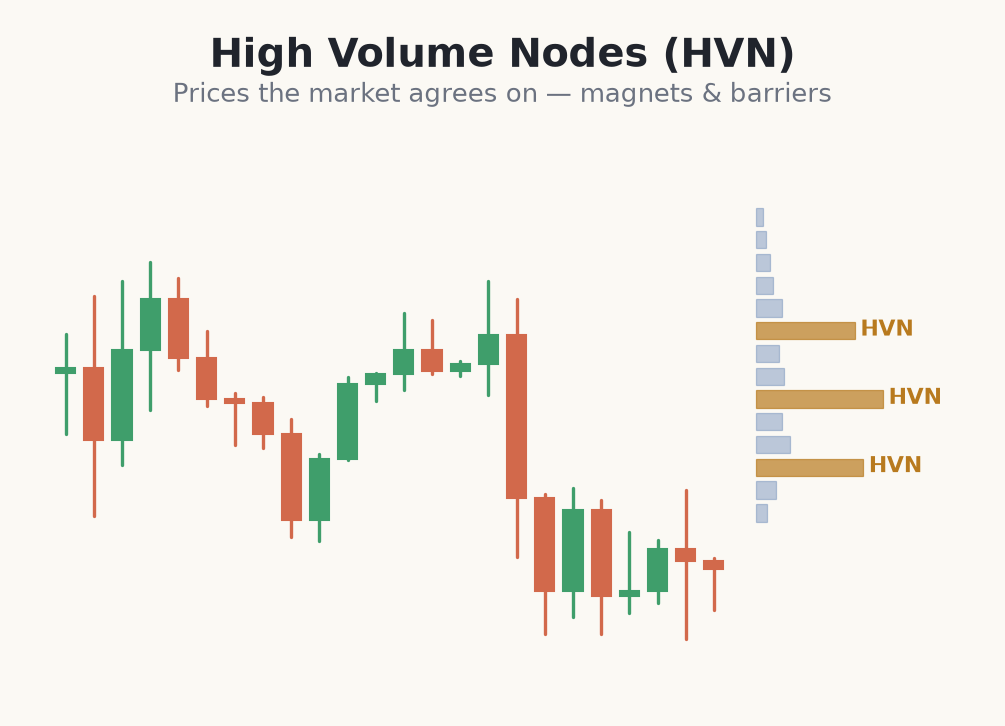
How to trade around an HVN
HVNs act like thick support and resistance zones. Approaching an HVN from above, you might expect it to act as support; from below, as resistance. A reasonable plan is to wait for price to react at the node and enter with a stop beyond the node, since a clean break all the way through it means agreement has shifted and your reason for the trade is gone.
Do not expect a precise turn. An HVN is a zone, not a line, and price can grind through the middle of it before deciding — that is exactly why momentum stalls there. Use it to anticipate where a move may pause, then let price confirm with a reaction before committing, rather than front-running the node.
- <strong>HVN = a volume peak</strong>, a price of heavy agreement.
- <strong>Price tends to</strong> consolidate, stall or reverse around it.
- <strong>Treat it as a thick</strong> support/resistance zone, not a single line.
- <strong>A decisive break</strong> through an HVN signals a shift in agreement.
- <strong>Wait for a reaction</strong> in the zone before entering, with a stop beyond it.
Trading a bounce off an HVN as support
- 1On the 1-hour gold chart, the swing profile shows a clear HVN centred at 2,340, a zone roughly from 2,336 to 2,344 where heavy trading occurred.
- 2Price is trending up and pulls back down into the top of the HVN. You expect the thick node to act as support and slow the decline.
- 3You wait for proof: a bullish rejection candle forms inside the node at 2,341 with a long lower wick. Buyers are defending the agreement zone.
- 4You enter long at 2,343 on the close. Your stop goes below the whole node at 2,333 — a clean break through the HVN means agreement shifted. Risk = $10.
- 5Account $6,000, risking 1% = $60. On gold at $1 per $0.10 per micro-contract, a $10 stop = $100 per micro... so you size 0.5 micro-equivalent (or drop to a broker offering fractional) to keep risk near $60.
- 6You target the prior swing high near 2,375, ~$32 away — about 3:1. The HVN gave the level; the rejection candle gave the trigger.
Common mistakes trading high volume nodes
- Treating the node as a precise line. An HVN is a thick zone. Price grinds inside it before deciding — expect chop, not a clean pivot.
- Entering without a reaction. The node marks where price may stall, not a guaranteed turn. Wait for a rejection candle before committing.
- Placing the stop inside the node. A stop within the HVN gets clipped by the normal churn there. Put it beyond the whole zone.
- Fading a strong trend into an HVN. In a powerful move, price can plough straight through the node. Respect the higher-timeframe trend first.
- Ignoring a decisive break. When price closes firmly through an HVN on strong volume, agreement has shifted — stop expecting support or resistance there.
High volume nodes are the market's comfort zones — price tends to slow and stick there, making them natural areas for reactions.
Paired with the LVNs in the next module, HVNs give you a map of where price will slow down and where it will speed up. That rhythm — sticky nodes and thin gaps — is one of the most practical outputs of the whole volume profile.